Showing posts with label promarkers. Show all posts

Friday, 14 November 2014

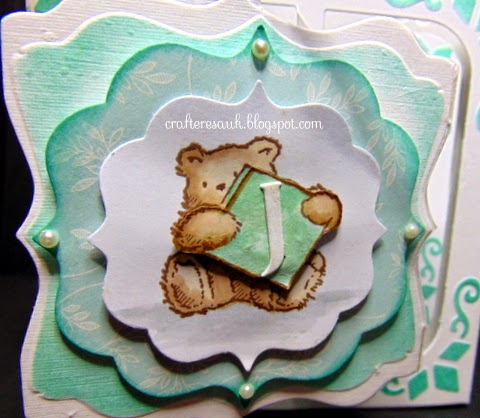
Fancy Labels Accordian Card with Message Bears

I have had some crafty fun this last few days....I already shared the shadow box card now I want to share another card I have made. This is an accordion die card created using the Karen Burniston Fancy Labels Accordion die from Elizabeth Craft.....
Here's a close up of the fancy labels and of one of the Penny Black Message Bear, there are four different ones in the collection, they were all coloured the with Promarkers.
Here the four message bears are spelling out the word "JENNI" (it's for my friend Jenni's birthday). Now as for the die its very clever how it works, The die is just one of those four squares with a tab down the side, you make as many as you want and connect them together so if your birthday boy is named "Christopher" you can make a card for him like this too! or you could even spell out "Happy Birthday!" if you desired, the possibilities are endless.
For he front of the card I cut some paper to cover it. That middle label image swivels to the 2nd side too, the rest of the frames are left white with the embossing inked up with my new inkpad Coastal Cabana by Stampin up, surprisingly this co-ordinated perfectly with the scrapbooking papers I used... Capsule Collection Eau de Nil its like a pale aqua jade! I love it with the crisp white.
I am entering this creation into a few challenges.....

 Ooh La La .....More Than One Fold.....check, lots of folds!
Crafting for all Seasons .....Birthdays.....check Birthday card!
Fab 'n' Funky .....Happy Birthday.....check birthday card!
Craft Your Passion .....Something Beginning with B..... check....Birthday brown bears!
Inky Impressions .....Animals ..... Bears are animals!
Penny Black and More .....Anything Goes
heres a view looking down from above the card, everything is linked up concertina style, this brings such a surprise to the recipient (Jenni another crafter friend loved it). the only embelishments I used were on the front....some stick on faux pearls. I could have added lots of flowers and swirl die cuts, but i wanted to keep the delicateness of the card and not overwhem the teddy bear images. I'm thinking now of getting the oval die in this collection, I will have to see what I get for Christmas but trust me i will drop some hints LOL

Sunday, 19 October 2014

Super Pup, Ethans Birthday Card

I shared yesterday about Super Pup...a digi-stamp by Tiddly Inks. Well after spending ages trying to get my printer to speak to my laptop and play nicely, I finally got it printed out 4 times onto smooth card and I coloured the images with my Promarkers. Well after cutting and layering the image decoupage style using foam pads, I created a card that really made me smile lots which is just what the doctor ordered LOL, here's a close up of Super Pup.....
I made the eyes and nose shine using Glossy Accents. To create a cloudy background I used my powder blue pan pastel with an acetate template for the sky I stamped with my Lovely as a Tree stamp by Stampin' Up at the bottom of the rectangular scene to give the idea that the pup is flying higher than the tree tops,  I used some tiny polymer stamps to create a flock of birds flying into the distance. After setting the pan pastels with hairspray I added the Super Pup decoupaged image to the background to complete the scene.
I matted and layered the completed scene onto mat black card and then onto blue holographic card and attached it to my white A5 card blank. I tried to use a white pen over a grey Promarker to add like little jet stream from the cape and back legs to give flying movement but it doesn't really show up much at all.
I think if I use this image in a similar way again I will make the image of Super Pup much smaller which will be more effective, but this one is for my grandson Ethan celebrates his birthday this week, I know he will love it and will be convinced that Super Pup is our doggy Lulu in the picture.
I am entering this card into a few challenges, 
The Alphabet Challenge.....R is for Round or Rectangle
Send a Smile 4 Kids Challenge.....Celebration Cards 4 Kids
Creative Knockouts.....Animal Friends

I have purposely not put "Happy Birthday" on the card as I know my grandson Ethan will want this card to be framed and hung on his bedroom wall after his birthday.  this pup looks so like our Lulu!
Kev and I have been visiting for the weekend to celebrate Ethans birthday (which is actually next Tuesday), We live over 100 miles away so only see each other every couple of months! We have had a fab time finishing off with a small surprise party for him, we bought super hero cups plates table cloth and birthday banners which co-ordinated perfectly with his card, we couldn't have planned it better! still finding it hard to believe our Ethan is 11 years old this week!
Lulu and Super Pup look like the same doggy! (she has hung her cape up here LOL)

I now one thing! creating this card really made me smile and cheered me up on a day which had been quite stressful, even though I was up very late finishing it

Tuesday, 14 October 2014

As Lovely As A Tree.....Centre Step Card

Today I want to share a thank you card which is made especially for the mental health team who work from The Woodlands Resource Centre, in St Annes on Sea. I have had a lot of support during my illness and it was world mental health day last week so I though I should send a thank you card to them and what better image to use than this one for their card? (woodlands!!!)
I used this Stampin Up set below to create it...
 I have been trying to buy this Stampin Up "Lovely as a Tree" stamp set" for ages, I absolutely love the grove of trees (bottom stamp) I bleieved the set had been retired so didn't bother going to Stampin Up for it. I kept bidding on eBay for them but was always outbid at the last minute. in desperation I asked Cal a Stampin Up demonstrator (her username is HysteriCal on ukscrappers) for help.
To my surprise she told me that its the one set that has lasted so long without retiring it's that popular! So I ordered it along with my new Stampin Up paper trimmer (which is fabulous but that's another post!!!) I have marked the centre of the block with pencil to help me in a project I am trying out!
So the first card I have created with it is a centre step card but I used the landscape style rather than the usual tall portrait version as it fitted the image better! unfortunately I see looking at the photo now that 2 of my sticky back gems have dropped off at the bottom GASP!!! I shall go back and stick them all on properly with glossy accents! so glad that I haven't posted it already!
I used an embossing folder which gives a wood grain effect behind the image and I used the long spellbinders Parisian border die at the bottom. the "Thank You" is die cut using a Robert Adams die
To colour the image which was stamped with my Rich Cocoa Momento ink pad, I used Promarkers.
I decided to send the ground further back than the stamped tree mound edges as I didn't want to give the sense that the trees were on the edge of a cliff! 
I wasn't totally satisfied with the sky which I had coloured at the bottom and blended into the green and then brought colour down from the top too so I used a powder blue pan pastel very lightly but leaving some white till I got the desired effect.
I am really pleased with the card and cant wait to think up some lovely Christmas designs once I have played some more with this fabulous stamp set LOL

CHALLENGES...
I'm entering a few challenges again today as it inspires me to keep to crafting especially when in pain or just feeling blaaaahhhh!
Their name is linked to their respective blogs so just click to go to them!

Creative Card Crew.....Black Cardstock
Ooh La La Creations.....Inspired by Nature
Little Red Wagon.....Give Thanks
Creative Knockouts.....Thankful
Sisters of Craft.....Anything Goes
Inspiration Destination..........Antything Goes