That's it! I have made my decision!! next year will be different!!!
Because of my restricting disability I got most of my shopping done early this year for Christmas! I went into panic mode in November and did a lot of online shopping which was very pleasing. Then on my better days when I felt I had the energy and Kev with me we went shopping together and happily by the beginning of December it was all done and dusted which is an absolute first for me. Trouble is that put other things out of sync as my focus was on the presents! so here I am on the 16th of December with only 5 handmade Christmas cards completed. I am not stressed this year about the prezzies but I am stressed about the cards. As I am quite a good card maker everyone expects a really nice card from me and this year I just cannot do that for everyone as I am not feeling very well either. Therefore I have had to bite the bullet and commit to only making handmade cards for a few of my many friends and church family. I have actually bought two packs of shop Christmas cards !!!GASP!!! the truth is I spent more time thinking about them and viewing Pinterest than getting down to doing them, oh dear!
BUT next year will be different! I have decided to make 4 Christmas cards per month so that when the time comes I should already have at least 40 cards made plus any more I make as a batch in October / November. Maybe I will join one of those card challenges especially for Christmas. have any of you done that? did it motivate you?
I don't make new years resolutions as they always get broken I make a kinda bucket list instead and this is definitely going on it for 2015!
not sure how much blogging will get done over this next 3 weeks but I do wish you all a very happy and blessed Christmas and New Year.
Sending special thanks and Christmas wish of peace to all my followers xxx

Tuesday, 16 December 2014
Friday, 12 December 2014
Poinsettia Christmas Table Papercraft
I mentioned in my last post that I have been busy making table and individual name place settings for my church Christmas fellowship meal, We had a fabulous time this evening, I really enjoyed celebrating Christmas with my church family. I love them all at Fylde Christian Service Church in St Annes, Lancashire.


 the table names were made with the same poinsettia and holly but the lovely lacy gold background was cut using a spellbinders die (ornate squares) I just made a kind of triangle to make it all stand up
 We had a lovely evening which was finished off with singing carols.
The organising had been seamless, everything ran so smoothly, the food was lovely and everyone was blessed. Many of us at church have had struggles and trials this year. we have loved, prayed and encouraged each other through it all just like a family should. we have cried and we have laughed together as we have celebrated many victories and happier times too. none of us are perfect (not even me LOL) we have all contributed somehow to the church using our gifts which God has graciously given us and this is one of my gifts, the creative ability to make stuff thanks you God for that x
Firtly it was so encouraging to see that the same colour theme of red gold and green had been used for the table runners and crackers etc.
Here's a close up below of an individual place name setting..
I used my Silhouette Cameo to cut the poinsettia and a punch for the holly leaves. the sizzix banner die cut in gold holographic card made a good background for the name which was printed using my laptop with castellar font onto cream card. Inside each one I stuck a tiny envelope (which I made using a punch) with a scripture inside...
The organising had been seamless, everything ran so smoothly, the food was lovely and everyone was blessed. Many of us at church have had struggles and trials this year. we have loved, prayed and encouraged each other through it all just like a family should. we have cried and we have laughed together as we have celebrated many victories and happier times too. none of us are perfect (not even me LOL) we have all contributed somehow to the church using our gifts which God has graciously given us and this is one of my gifts, the creative ability to make stuff thanks you God for that x
Monday, 8 December 2014
hello everyone
I'm just popping in to day hello and to say sorry for being AWOl !
My card making and challenge entering had to stop for a while as I used my time to help with some craft projects at church, Firstly I made some star decorations for an event, then as the the church Christmas meal was being organised I volunteered to create 70 place names and 7 table names!
I wanted to do a good job as this is the first Christmas meal in our new building, previously we had gone to a local hotel for our Christmas fellowship meal but this year is extra special.
well it's taken me a lot longer than expected, I am not as quick as I used to be but to be fair there was a lot of work it was like doing a wedding! I have to say I am blessed to be able to do it for the church, a lot of folk have prayed me through my illness and encouraged me and Kev when we were so in need of help they were all there for us and now its time to give a little something back. I will pop back at the end of the week with photo's of thesename places and maybe even some photo's of the meal too, I am so looking forward to this blessed time of fellowship together.
now although I have most of the prezzies sorted for Christmas I still have loads to do, can you believe I have only created 2 cards so far? GASP!! think I need to get a move on LOL
see ya soon
Friday, 14 November 2014
Fancy Labels Accordian Card with Message Bears
I have had some crafty fun this last few days....I already shared the shadow box card now I want to share another card I have made. This is an accordion die card created using the Karen Burniston Fancy Labels Accordion die from Elizabeth Craft.....
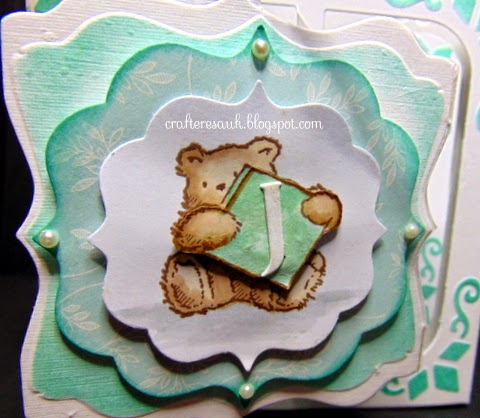


Here's a close up of the fancy labels and of one of the Penny Black Message Bear, there are four different ones in the collection, they were all coloured the with Promarkers.
Here the four message bears are spelling out the word "JENNI" (it's for my friend Jenni's birthday). Now as for the die its very clever how it works, The die is just one of those four squares with a tab down the side, you make as many as you want and connect them together so if your birthday boy is named "Christopher" you can make a card for him like this too! or you could even spell out "Happy Birthday!" if you desired, the possibilities are endless.
For he front of the card I cut some paper to cover it. That middle label image swivels to the 2nd side too, the rest of the frames are left white with the embossing inked up with my new inkpad Coastal Cabana by Stampin up, surprisingly this co-ordinated perfectly with the scrapbooking papers I used... Capsule Collection Eau de Nil its like a pale aqua jade! I love it with the crisp white.
I am entering this creation into a few challenges.....
Ooh La La .....More Than One Fold.....check, lots of folds!
Crafting for all Seasons .....Birthdays.....check Birthday card!
Fab 'n' Funky .....Happy Birthday.....check birthday card!
Craft Your Passion .....Something Beginning with B..... check....Birthday brown bears!
Inky Impressions .....Animals ..... Bears are animals!
Penny Black and More .....Anything Goes
heres a view looking down from above the card, everything is linked up concertina style, this brings such a surprise to the recipient (Jenni another crafter friend loved it). the only embelishments I used were on the front....some stick on faux pearls. I could have added lots of flowers and swirl die cuts, but i wanted to keep the delicateness of the card and not overwhem the teddy bear images. I'm thinking now of getting the oval die in this collection, I will have to see what I get for Christmas but trust me i will drop some hints LOL
Monday, 10 November 2014
Shadow Box Card and a Cute cat
Some of my very favourite rubber stamps in my collection are made by Penny Black. I have used their stamps for many years. I love their Teddy Bear stamps and the Hedgehogs too, they also produce some lovely cat stamps, This stamp is entitled "Primp" its so cute. I have used Promarkers to colour the image which was stamped using a Momento Tuxedo Black ink pad, I made the mirror glass shine with Glossy Accents...


This is a birthday card for someone who is "very girly" so I used the colour combo of black white and pink with a touch of silver and some sparkly ab bling
I created a shadow box card using the Spellbinders Borderabiliies A2 Scalloped Borders One die set. I love that lacy edge the dies create, their are a number of different options on how to use them to create different edge effects from this 7 die set.
I used my Tattered Lace ornate rose die for the swirly silver flourishes (top left) The black dotted frame was created using sizzix labels framelits die with a circle die, Finishing off I stuck seven gupiure lace flowers with ab blingy little centres then tiny little gems on the cat's roller pins, mirror and perfume bottle.
Here's a view looking from the top to show the "box" this card can be easily sent in the post by pulling the 2 scalloped sides outward and laying the card flat in the envelope.
I am entering a few challenges again this week...
click on the challenge name it;s a link to visit their blog!
click on the challenge name it;s a link to visit their blog!
Addicted to Stamps .....Bling Bling
Robyn's Fetish .....Cats
Penny Black and More .....Anything Goes
The Paper Nest Dolls .....Anythng Goes
Ooh La La Creations .....More than 1 fold
Eureka Stamps .....Four Legged Friends
thanks for visiting my blog today, hope that you enjoyed the shadow box card
have a great week
Crafteresa UK xx
Eureka Stamps .....Four Legged Friends
thanks for visiting my blog today, hope that you enjoyed the shadow box card
have a great week
Crafteresa UK xx
Wednesday, 29 October 2014
Glowing Candles, First 2014 Christmas Card!
At last! I have the first of my Christmas cards to reveal. I am entering a few challenges with this one, I also challenged myself to only use dies, punches or embossing folders...
To begin with I wanted to create a white on white card but half way through I changed my mind after seeing my gold and white card together on my desk! unfortunately I have found it very hard to take photographs of this card, either the white looks grey or shines too bright to look at. this gold is lovely but is looking more of a garish yellow, (very frustrating grrr)
I added a bit of bling with amber coloured gems to finish the card off.
I am entering this card into a few challenges.....
Crafty Card Makers.....cut it out! die cutting or punching
House of Cards.....use a punch or die
Winter Wonderland.....Gold Christmas
Allsorts.....Christmas
Crafty Bloggers.....Christmas
It's nice to find some challenges to enter that are not haloween based, as I am a Christian I do not celebrate halloween at all, I would much rather celebrate light than darkness! mind you, being totally scared of spiders even at my age makes halloween something I want to miss!
Dies used: Glowing Candles by Memory Box, Victorian Lace Antique Ovals by Tattered Lace
Spellbinders Edgeabilites Classc Scallop and a decorative inset from another Edgeabilities set Lea'bilities Holly set (used spruce)
thanks for visiting today
have a good week!
I used the Glowing Candles Memory Box die which I cut in gold card then created white candle insets so that the gold dripping wax effect was enhanced. I cut the foliage again in white, and added bits of it here n there! I made punched twiggy bits using the Martha Stewart branch punch in white and gold and a couple of sprigs of spruce using a Lea'abilities set. The poinsettia flower was hand cut
 The frame behind is the Victorian Lace die by Tattered Lace which was cut using white pearl card.
I had a bit of a struggle with the sentiment I couldn't decide where to put it or even whether to use it at all, I'm still not happy but it's stuck down now! next time I will try it without!
I added a bit of bling with amber coloured gems to finish the card off.
I am entering this card into a few challenges.....
Crafty Card Makers.....cut it out! die cutting or punching
House of Cards.....use a punch or die
Winter Wonderland.....Gold Christmas
Allsorts.....Christmas
Crafty Bloggers.....Christmas
It's nice to find some challenges to enter that are not haloween based, as I am a Christian I do not celebrate halloween at all, I would much rather celebrate light than darkness! mind you, being totally scared of spiders even at my age makes halloween something I want to miss!
Spellbinders Edgeabilites Classc Scallop and a decorative inset from another Edgeabilities set Lea'bilities Holly set (used spruce)
thanks for visiting today
have a good week!
Friday, 24 October 2014
Rudolph the Red Nose Reindeer
I've been trawling Pinterest over the last couple of days to find some crafty makes I can have a go at for Christmas, One of my favourites was this cute little bag of reindeer noses. Rudolph was made with the Stampin' Up owl punch which just happens to be on order along with the bird builder punch!

I'm thinking it would be fun to make some of these up to give alongside other gifts. I found them on Pinterest but can't link to the actual website so here's the link on Pinterest HERE
The brown noses are obviously maltesers but what about the red ones? where do I get them from? what are they? any suggestions?

This was the other design I found using the same punch but these are obviously a different sweetie.
I found this version HERE.....I think I will have to go into one of those old fashioned sweet shops! We have one in St Annes but I have never been in that shop yet as I would have to bring back some samples to taste LOL.

And finally I found this cute version, I love the re-wrapped little chocolates, its a great way to use up scraps of patterned paper and it looks fabulous, very designer I think! I found this item HERE

I just can't wait to get my owl punch from Stampin Up, I have made a board especially for it on Pinterest as there are loads of other crafty ways to use the punch.....from penguins to monsters, pirate owls to Winnie the pooh and then tiny little baby dresses etc etc. the more I look through the internet especially Pinterest, the more I am amazed at how clever paper-crafters really are, what a wonderful thing an imaginative inspired mind is!!
Sunday, 19 October 2014
Super Pup, Ethans Birthday Card
I shared yesterday about Super Pup...a digi-stamp by Tiddly Inks. Well after spending ages trying to get my printer to speak to my laptop and play nicely, I finally got it printed out 4 times onto smooth card and I coloured the images with my Promarkers. Well after cutting and layering the image decoupage style using foam pads, I created a card that really made me smile lots which is just what the doctor ordered LOL, here's a close up of Super Pup.....

I made the eyes and nose shine using Glossy Accents. To create a cloudy background I used my powder blue pan pastel with an acetate template for the sky I stamped with my Lovely as a Tree stamp by Stampin' Up at the bottom of the rectangular scene to give the idea that the pup is flying higher than the tree tops, I used some tiny polymer stamps to create a flock of birds flying into the distance. After setting the pan pastels with hairspray I added the Super Pup decoupaged image to the background to complete the scene.

I matted and layered the completed scene onto mat black card and then onto blue holographic card and attached it to my white A5 card blank. I tried to use a white pen over a grey Promarker to add like little jet stream from the cape and back legs to give flying movement but it doesn't really show up much at all.

I think if I use this image in a similar way again I will make the image of Super Pup much smaller which will be more effective, but this one is for my grandson Ethan celebrates his birthday this week, I know he will love it and will be convinced that Super Pup is our doggy Lulu in the picture.

I am entering this card into a few challenges,
The Alphabet Challenge.....R is for Round or Rectangle
Chocolate Coffee & Cards Challenges.....For The Boys
Send a Smile 4 Kids Challenge.....Celebration Cards 4 Kids
Creative Knockouts.....Animal Friends
I have purposely not put "Happy Birthday" on the card as I know my grandson Ethan will want this card to be framed and hung on his bedroom wall after his birthday. this pup looks so like our Lulu!

Kev and I have been visiting for the weekend to celebrate Ethans birthday (which is actually next Tuesday), We live over 100 miles away so only see each other every couple of months! We have had a fab time finishing off with a small surprise party for him, we bought super hero cups plates table cloth and birthday banners which co-ordinated perfectly with his card, we couldn't have planned it better! still finding it hard to believe our Ethan is 11 years old this week!

Lulu and Super Pup look like the same doggy! (she has hung her cape up here LOL)
I now one thing! creating this card really made me smile and cheered me up on a day which had been quite stressful, even though I was up very late finishing it
Thursday, 16 October 2014
Super Pup Digi stamp by Tiddly Inks
WOW I just fell in love with a digi-stamp. I love my rubber stamps and the feel of using them, I don't usually buy digi-stamps unless they are something special, but this one is super special!
 Not many of you will know that I am the proud owner (and mommy) of a beautiful West Highland White Terrier, she is our joy and we love her to bits, here she is a couple of years ago above.


and here she is a couple of weeks ago on a very windy day! she never seems to look at the camera with her ears up, I think she enjoys being difficult just for fun, she has loads of character.
well here's the digi-stamp I have found at Tiddly Inks, is this cute or what? its titled "Super Pup"
there are other images featuring the same cute doggy, I think I will have to get them all. But this one is just perfect for my grandsons birthday card... Ethan kinda believes we talk to each other (me n Lulu),he asks me what she just said LOL he loves her to bits and is always asking about her when we talk on the phone. I will blog again with the finished card tomorrow I thik he will love it!
Wednesday, 15 October 2014
WOW I Have Bbeen Featured!
Wow! what a lovely surprise to be featured on the Little Red Wagon challenge blog. My centre step Lovely as a Tree card was featured.
 That was such a welcome surprise, and to be honest I needed a lift today, Thanks so much
Little Red Wagon, hoping to play along again soon, I'm off to add my first button to my sidebar ;o)
Little Red Wagon, hoping to play along again soon, I'm off to add my first button to my sidebar ;o)
Tuesday, 14 October 2014
As Lovely As A Tree.....Centre Step Card
Today I want to share a thank you card which is made especially for the mental health team who work from The Woodlands Resource Centre, in St Annes on Sea. I have had a lot of support during my illness and it was world mental health day last week so I though I should send a thank you card to them and what better image to use than this one for their card? (woodlands!!!)
I used this Stampin Up set below to create it...
 I have been trying to buy this Stampin Up "Lovely as a Tree" stamp set" for ages, I absolutely love the grove of trees (bottom stamp) I bleieved the set had been retired so didn't bother going to Stampin Up for it. I kept bidding on eBay for them but was always outbid at the last minute. in desperation I asked Cal a Stampin Up demonstrator (her username is HysteriCal on ukscrappers) for help.
 To my surprise she told me that its the one set that has lasted so long without retiring it's that popular! So I ordered it along with my new Stampin Up paper trimmer (which is fabulous but that's another post!!!) I have marked the centre of the block with pencil to help me in a project I am trying out!


 I am really pleased with the card and cant wait to think up some lovely Christmas designs once I have played some more with this fabulous stamp set LOL
CHALLENGES...
I'm entering a few challenges again today as it inspires me to keep to crafting especially when in pain or just feeling blaaaahhhh!
Their name is linked to their respective blogs so just click to go to them!
Creative Card Crew.....Black Cardstock
Ooh La La Creations.....Inspired by Nature
Little Red Wagon.....Give Thanks
Creative Knockouts.....Thankful
Sisters of Craft.....Anything Goes
Inspiration Destination..........Antything Goes
I used this Stampin Up set below to create it...
So the first card I have created with it is a centre step card but I used the landscape style rather than the usual tall portrait version as it fitted the image better! unfortunately I see looking at the photo now that 2 of my sticky back gems have dropped off at the bottom GASP!!! I shall go back and stick them all on properly with glossy accents! so glad that I haven't posted it already!
I used an embossing folder which gives a wood grain effect behind the image and I used the long spellbinders Parisian border die at the bottom. the "Thank You" is die cut using a Robert Adams die
To colour the image which was stamped with my Rich Cocoa Momento ink pad, I used Promarkers.
I decided to send the ground further back than the stamped tree mound edges as I didn't want to give the sense that the trees were on the edge of a cliff!
I wasn't totally satisfied with the sky which I had coloured at the bottom and blended into the green and then brought colour down from the top too so I used a powder blue pan pastel very lightly but leaving some white till I got the desired effect.
CHALLENGES...
I'm entering a few challenges again today as it inspires me to keep to crafting especially when in pain or just feeling blaaaahhhh!
Their name is linked to their respective blogs so just click to go to them!
Creative Card Crew.....Black Cardstock
Ooh La La Creations.....Inspired by Nature
Little Red Wagon.....Give Thanks
Creative Knockouts.....Thankful
Sisters of Craft.....Anything Goes
Inspiration Destination..........Antything Goes
Friday, 10 October 2014
Side Step Card & Cute Knitting Die Cuts
The Christmas cards are still a work in progress, to be honest I keep changing my mind on exactly what I wanna do so I'm still thinking that through especailly which papers to use so I wanted to try something totally different today... I browsed on Pinterest (a favourite armchair activity lol) and I found samples of side step cards I have only ever created centre step cards so I decided I really had to have a go! theres even one based on a semicircle but that's for another day LOL!
 I needed to make a thank you card for my close friend Kath, she has been helping me to make some preemie baby hats for another friends littlle baby girl who was born very early. Kath has made the knitted ones while I have made some crochet ones. I love how realistic these Marianne Design die cuts have turned out. I embossed them then used a promarker to accent the embossing.
 This is the front view of the side step card I made today. As well as the the Marianne Design die set I mentioned earlier I also used the Tattered Lace ornamental rose die. The thank you circle is a small clear stamp which was stamped then heat embossed in silver and cut with a circle die. I used a silver marker to colour the knitting needles, they look quite realistic!
 I have wanted to participate in some card challenges for a while but I always seem to miss the deadlines or tiredness and my health problems get in the way, However, I am gonna break that cycle now and enter this card into a few challenges, kinda like getting back into what I really love to do...card making and scrapbooking! actually playing with all things pertaining to papercrafting.
CHALLENGES
Here's the challenges I'm entering this card into,
Select the name as this is linked to the relevent website
Inspiration Destination.....Anything Goes
Sisters Of Craft.....Anything Goes
Little Red Wagon.....Giving Thanks
Creative Knockouts.....Thankful
In The Pink.....Fancy Folds and Pink
Crafty Hazelnuts.....Use Patterned Papers All Over the Card
The Sisterhood of Crafters.....Think Pink (breast cancer awareness)
Im feeling really happy now that I have learned a new card shape
but even more so that I have been back into card challenges again
But mostly because I like this card (I am usually over critical) and the recipient will love it
thanks for stopping by , I hope you have a great week
please leave me a comment before you go!
Saturday, 4 October 2014
replacing what was lost
I really need to make a start on my Christmas cards now that October is here and the holiday is over. last year I was so miffed about my Christmas cards because when I moved house last October, somehow I lost all of my dies and couldn't make the ones I had planned, in fact I hardly sent any cards at all last Christmas. One set of lost dies was the Deer Trio by Memory Box
 I love the fabulous cards people have made with these dies, I have even made a board on Pinterest of the many cards on line for inspiration. I had searched for them on and off for at least 9 months to replace the lost ones and finally found them last week,
 I had also lost a set of poinsettia dies, I have bought the Lea'bilities Multi Flower Poinsettia set to replace them although they're not the same as those lost I like the fact that they have the 2 flourishes and the actual flowers can be used as leaves any time of year too. I am looking forward to making a start on my Christmas cards this week I don't wanna miss anyone out this year so better get a move on LOl!
Sunday, 28 September 2014
Clever Couple!
As I have been trying to get back into scrapbooking I thought it would be a good idea to get back on the UKScrappers forum, I rejoined then I was invited to join the group entitled The Juicy Journallers who are part of the Red Ribbons house, I am getting acquainted with the members who have warmly welcomed me. I am excited about being a member of the group but hope I don't let them down.
 The weekly challenge on UKScrappers this week asked us to make a page with a white background, with at least 4 bright colours and with an alliterative title . So I have managed to collect 30 points for my first 2014 layout and I am really pleased, The flowers were cut using my Silhouette Cameo.
 I wanted to make a start on my holiday photo's but I also want to scrap honestly...
 When I say that I mean that it would be so easy to paint such a perfect happy nothing ever goes wrong deliriously sweetly nice page, but that's not the real picture of my life or anyone else's if they are honest! (The title was created and cut using my Silhouette Cameo)
 Before we went on holiday we were both so stressed over a myriad of things. When we're stressed we really don't communicate very well and that stress along with the lack of communication really rocked our relationship. Lets just say the holiday came at exactly the right time!
 I thought about the title, it nearly became Flamborough Fun but Clever Couple was what I chose in the end. I thought a lot about where we were at as a couple before the holiday and the total de-stress that the holiday brought. The journalling explains the title "Clever Couple" it says..."Clever Couples are not those who never argue or fall out! Clever Couples know to forgive freely, to move on, to believe for the best, to smile knowing that tomorrow is another day. After all they are in love!
Just in case you haven't spotted them...the 4+ colours are orange, mid blue, pastel green, rusty red, yellow, black and white as requested. I am more of a pastel one side of the colour wheel pretty paper sort of scrapper so this is not really my style at all and far too bright, but I am pleased with this first layout in a long time. thank You UKS for the challenge!
Just in case you haven't spotted them...the 4+ colours are orange, mid blue, pastel green, rusty red, yellow, black and white as requested. I am more of a pastel one side of the colour wheel pretty paper sort of scrapper so this is not really my style at all and far too bright, but I am pleased with this first layout in a long time. thank You UKS for the challenge!
Saturday, 20 September 2014
Land of the Giants!
Destination: Withernsea Sands
our family holiday September 2014...
our family holiday September 2014...
The first evening after unpacking and food shopping we went to check out the local beach....

and we found what looked like the front of a castle!
Then Matt spotted the small model of the same castle front and the history of the Withernsea pier

This was a great land of the giants style photo opportunity.
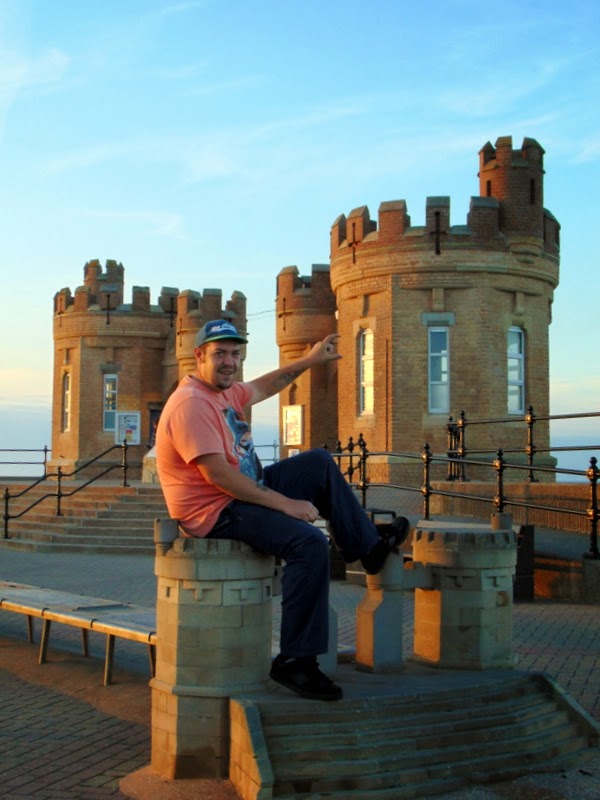
and my son Matt at the height of 6 foot 4 was a great giant LOL
This was the first holiday for Kev and myself in 3 years, redundancy, ill health, and a serious lack of funds ment holidays had been out of the question. We had never been on holiday as a family before with my son Matthew his partner Michaela and my grandson Ethan.
and what a fabulous family time we all had, just what the doctor ordered!
This next few posts will be about our family holiday at Withernsea and the many places we explored during our holiday!
Sunday, 7 September 2014
Bringing Back The Scrapbooking
I have been looking at scrapbooking a lot on Pinterest. I love Pinterest but oh boy I get so engrossed in it! Before I know it I have spent hours pinning and falling in love with layouts and pictures of babies etc etc oh yes and the awesome papers available now there's loads of techniques I have never tried but I really want to get back into the flow scrapbooking.
When Kev and I went out yesterday we bought a new camera ready for our holidays with the family. We bought a Sony Cybershot DSC H300. Wow, I love it, and it does so much more than our old camera too. I am gonna spend time this week looking at the different features of the camera and getting familiar with it so that I can get used to it and hopefully use it to it's best potential.


these two (above and below) are a double page spread,
that particular challenge called for 5 question marks and some lace!


Subscribe to:
Posts (Atom)