That's it! I have made my decision!! next year will be different!!!
Because of my restricting disability I got most of my shopping done early this year for Christmas! I went into panic mode in November and did a lot of online shopping which was very pleasing. Then on my better days when I felt I had the energy and Kev with me we went shopping together and happily by the beginning of December it was all done and dusted which is an absolute first for me. Trouble is that put other things out of sync as my focus was on the presents! so here I am on the 16th of December with only 5 handmade Christmas cards completed. I am not stressed this year about the prezzies but I am stressed about the cards. As I am quite a good card maker everyone expects a really nice card from me and this year I just cannot do that for everyone as I am not feeling very well either. Therefore I have had to bite the bullet and commit to only making handmade cards for a few of my many friends and church family. I have actually bought two packs of shop Christmas cards !!!GASP!!! the truth is I spent more time thinking about them and viewing Pinterest than getting down to doing them, oh dear!
BUT next year will be different! I have decided to make 4 Christmas cards per month so that when the time comes I should already have at least 40 cards made plus any more I make as a batch in October / November. Maybe I will join one of those card challenges especially for Christmas. have any of you done that? did it motivate you?
I don't make new years resolutions as they always get broken I make a kinda bucket list instead and this is definitely going on it for 2015!
not sure how much blogging will get done over this next 3 weeks but I do wish you all a very happy and blessed Christmas and New Year.
Sending special thanks and Christmas wish of peace to all my followers xxx

Tuesday, 16 December 2014

Friday, 12 December 2014
Poinsettia Christmas Table Papercraft
I mentioned in my last post that I have been busy making table and individual name place settings for my church Christmas fellowship meal, We had a fabulous time this evening, I really enjoyed celebrating Christmas with my church family. I love them all at Fylde Christian Service Church in St Annes, Lancashire.


 the table names were made with the same poinsettia and holly but the lovely lacy gold background was cut using a spellbinders die (ornate squares) I just made a kind of triangle to make it all stand up
 We had a lovely evening which was finished off with singing carols.
The organising had been seamless, everything ran so smoothly, the food was lovely and everyone was blessed. Many of us at church have had struggles and trials this year. we have loved, prayed and encouraged each other through it all just like a family should. we have cried and we have laughed together as we have celebrated many victories and happier times too. none of us are perfect (not even me LOL) we have all contributed somehow to the church using our gifts which God has graciously given us and this is one of my gifts, the creative ability to make stuff thanks you God for that x
Firtly it was so encouraging to see that the same colour theme of red gold and green had been used for the table runners and crackers etc.
Here's a close up below of an individual place name setting..
I used my Silhouette Cameo to cut the poinsettia and a punch for the holly leaves. the sizzix banner die cut in gold holographic card made a good background for the name which was printed using my laptop with castellar font onto cream card. Inside each one I stuck a tiny envelope (which I made using a punch) with a scripture inside...
The organising had been seamless, everything ran so smoothly, the food was lovely and everyone was blessed. Many of us at church have had struggles and trials this year. we have loved, prayed and encouraged each other through it all just like a family should. we have cried and we have laughed together as we have celebrated many victories and happier times too. none of us are perfect (not even me LOL) we have all contributed somehow to the church using our gifts which God has graciously given us and this is one of my gifts, the creative ability to make stuff thanks you God for that x
Monday, 8 December 2014
hello everyone
I'm just popping in to day hello and to say sorry for being AWOl !
My card making and challenge entering had to stop for a while as I used my time to help with some craft projects at church, Firstly I made some star decorations for an event, then as the the church Christmas meal was being organised I volunteered to create 70 place names and 7 table names!
I wanted to do a good job as this is the first Christmas meal in our new building, previously we had gone to a local hotel for our Christmas fellowship meal but this year is extra special.
well it's taken me a lot longer than expected, I am not as quick as I used to be but to be fair there was a lot of work it was like doing a wedding! I have to say I am blessed to be able to do it for the church, a lot of folk have prayed me through my illness and encouraged me and Kev when we were so in need of help they were all there for us and now its time to give a little something back. I will pop back at the end of the week with photo's of thesename places and maybe even some photo's of the meal too, I am so looking forward to this blessed time of fellowship together.
now although I have most of the prezzies sorted for Christmas I still have loads to do, can you believe I have only created 2 cards so far? GASP!! think I need to get a move on LOL
see ya soon
I'm just popping in to day hello and to say sorry for being AWOl !
My card making and challenge entering had to stop for a while as I used my time to help with some craft projects at church, Firstly I made some star decorations for an event, then as the the church Christmas meal was being organised I volunteered to create 70 place names and 7 table names!
I wanted to do a good job as this is the first Christmas meal in our new building, previously we had gone to a local hotel for our Christmas fellowship meal but this year is extra special.
well it's taken me a lot longer than expected, I am not as quick as I used to be but to be fair there was a lot of work it was like doing a wedding! I have to say I am blessed to be able to do it for the church, a lot of folk have prayed me through my illness and encouraged me and Kev when we were so in need of help they were all there for us and now its time to give a little something back. I will pop back at the end of the week with photo's of thesename places and maybe even some photo's of the meal too, I am so looking forward to this blessed time of fellowship together.
now although I have most of the prezzies sorted for Christmas I still have loads to do, can you believe I have only created 2 cards so far? GASP!! think I need to get a move on LOL
see ya soon
Friday, 14 November 2014
Fancy Labels Accordian Card with Message Bears
I have had some crafty fun this last few days....I already shared the shadow box card now I want to share another card I have made. This is an accordion die card created using the Karen Burniston Fancy Labels Accordion die from Elizabeth Craft.....
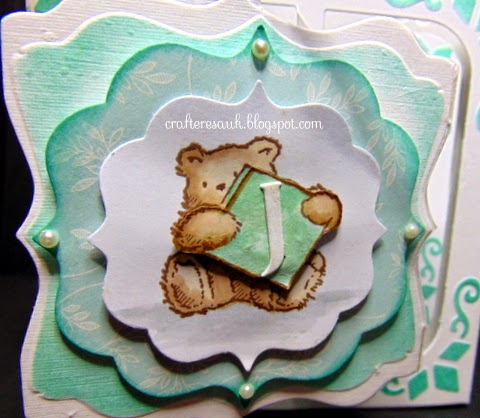


Here's a close up of the fancy labels and of one of the Penny Black Message Bear, there are four different ones in the collection, they were all coloured the with Promarkers.
Here the four message bears are spelling out the word "JENNI" (it's for my friend Jenni's birthday). Now as for the die its very clever how it works, The die is just one of those four squares with a tab down the side, you make as many as you want and connect them together so if your birthday boy is named "Christopher" you can make a card for him like this too! or you could even spell out "Happy Birthday!" if you desired, the possibilities are endless.
For he front of the card I cut some paper to cover it. That middle label image swivels to the 2nd side too, the rest of the frames are left white with the embossing inked up with my new inkpad Coastal Cabana by Stampin up, surprisingly this co-ordinated perfectly with the scrapbooking papers I used... Capsule Collection Eau de Nil its like a pale aqua jade! I love it with the crisp white.
I am entering this creation into a few challenges.....
Ooh La La .....More Than One Fold.....check, lots of folds!
Crafting for all Seasons .....Birthdays.....check Birthday card!
Fab 'n' Funky .....Happy Birthday.....check birthday card!
Craft Your Passion .....Something Beginning with B..... check....Birthday brown bears!
Inky Impressions .....Animals ..... Bears are animals!
Penny Black and More .....Anything Goes
heres a view looking down from above the card, everything is linked up concertina style, this brings such a surprise to the recipient (Jenni another crafter friend loved it). the only embelishments I used were on the front....some stick on faux pearls. I could have added lots of flowers and swirl die cuts, but i wanted to keep the delicateness of the card and not overwhem the teddy bear images. I'm thinking now of getting the oval die in this collection, I will have to see what I get for Christmas but trust me i will drop some hints LOL
Monday, 10 November 2014
Shadow Box Card and a Cute cat
Some of my very favourite rubber stamps in my collection are made by Penny Black. I have used their stamps for many years. I love their Teddy Bear stamps and the Hedgehogs too, they also produce some lovely cat stamps, This stamp is entitled "Primp" its so cute. I have used Promarkers to colour the image which was stamped using a Momento Tuxedo Black ink pad, I made the mirror glass shine with Glossy Accents...


This is a birthday card for someone who is "very girly" so I used the colour combo of black white and pink with a touch of silver and some sparkly ab bling
I created a shadow box card using the Spellbinders Borderabiliies A2 Scalloped Borders One die set. I love that lacy edge the dies create, their are a number of different options on how to use them to create different edge effects from this 7 die set.
I used my Tattered Lace ornate rose die for the swirly silver flourishes (top left) The black dotted frame was created using sizzix labels framelits die with a circle die, Finishing off I stuck seven gupiure lace flowers with ab blingy little centres then tiny little gems on the cat's roller pins, mirror and perfume bottle.
Here's a view looking from the top to show the "box" this card can be easily sent in the post by pulling the 2 scalloped sides outward and laying the card flat in the envelope.
I am entering a few challenges again this week...
click on the challenge name it;s a link to visit their blog!
click on the challenge name it;s a link to visit their blog!
Addicted to Stamps .....Bling Bling
Robyn's Fetish .....Cats
Penny Black and More .....Anything Goes
The Paper Nest Dolls .....Anythng Goes
Ooh La La Creations .....More than 1 fold
Eureka Stamps .....Four Legged Friends
thanks for visiting my blog today, hope that you enjoyed the shadow box card
have a great week
Crafteresa UK xx
Eureka Stamps .....Four Legged Friends
thanks for visiting my blog today, hope that you enjoyed the shadow box card
have a great week
Crafteresa UK xx
Wednesday, 29 October 2014
Glowing Candles, First 2014 Christmas Card!
At last! I have the first of my Christmas cards to reveal. I am entering a few challenges with this one, I also challenged myself to only use dies, punches or embossing folders...
To begin with I wanted to create a white on white card but half way through I changed my mind after seeing my gold and white card together on my desk! unfortunately I have found it very hard to take photographs of this card, either the white looks grey or shines too bright to look at. this gold is lovely but is looking more of a garish yellow, (very frustrating grrr)
I added a bit of bling with amber coloured gems to finish the card off.
I am entering this card into a few challenges.....
Crafty Card Makers.....cut it out! die cutting or punching
House of Cards.....use a punch or die
Winter Wonderland.....Gold Christmas
Allsorts.....Christmas
Crafty Bloggers.....Christmas
It's nice to find some challenges to enter that are not haloween based, as I am a Christian I do not celebrate halloween at all, I would much rather celebrate light than darkness! mind you, being totally scared of spiders even at my age makes halloween something I want to miss!
Dies used: Glowing Candles by Memory Box, Victorian Lace Antique Ovals by Tattered Lace
Spellbinders Edgeabilites Classc Scallop and a decorative inset from another Edgeabilities set Lea'bilities Holly set (used spruce)
thanks for visiting today
have a good week!
I used the Glowing Candles Memory Box die which I cut in gold card then created white candle insets so that the gold dripping wax effect was enhanced. I cut the foliage again in white, and added bits of it here n there! I made punched twiggy bits using the Martha Stewart branch punch in white and gold and a couple of sprigs of spruce using a Lea'abilities set. The poinsettia flower was hand cut
 The frame behind is the Victorian Lace die by Tattered Lace which was cut using white pearl card.
I had a bit of a struggle with the sentiment I couldn't decide where to put it or even whether to use it at all, I'm still not happy but it's stuck down now! next time I will try it without!
I added a bit of bling with amber coloured gems to finish the card off.
I am entering this card into a few challenges.....
Crafty Card Makers.....cut it out! die cutting or punching
House of Cards.....use a punch or die
Winter Wonderland.....Gold Christmas
Allsorts.....Christmas
Crafty Bloggers.....Christmas
It's nice to find some challenges to enter that are not haloween based, as I am a Christian I do not celebrate halloween at all, I would much rather celebrate light than darkness! mind you, being totally scared of spiders even at my age makes halloween something I want to miss!
Spellbinders Edgeabilites Classc Scallop and a decorative inset from another Edgeabilities set Lea'bilities Holly set (used spruce)
thanks for visiting today
have a good week!
Friday, 24 October 2014
Rudolph the Red Nose Reindeer
I've been trawling Pinterest over the last couple of days to find some crafty makes I can have a go at for Christmas, One of my favourites was this cute little bag of reindeer noses. Rudolph was made with the Stampin' Up owl punch which just happens to be on order along with the bird builder punch!

I'm thinking it would be fun to make some of these up to give alongside other gifts. I found them on Pinterest but can't link to the actual website so here's the link on Pinterest HERE
The brown noses are obviously maltesers but what about the red ones? where do I get them from? what are they? any suggestions?

This was the other design I found using the same punch but these are obviously a different sweetie.
I found this version HERE.....I think I will have to go into one of those old fashioned sweet shops! We have one in St Annes but I have never been in that shop yet as I would have to bring back some samples to taste LOL.

And finally I found this cute version, I love the re-wrapped little chocolates, its a great way to use up scraps of patterned paper and it looks fabulous, very designer I think! I found this item HERE

I just can't wait to get my owl punch from Stampin Up, I have made a board especially for it on Pinterest as there are loads of other crafty ways to use the punch.....from penguins to monsters, pirate owls to Winnie the pooh and then tiny little baby dresses etc etc. the more I look through the internet especially Pinterest, the more I am amazed at how clever paper-crafters really are, what a wonderful thing an imaginative inspired mind is!!
Subscribe to:
Posts (Atom)